• 2019-2020 Annual Catalog,  2020-2021 Annual Catalog,  Friendship

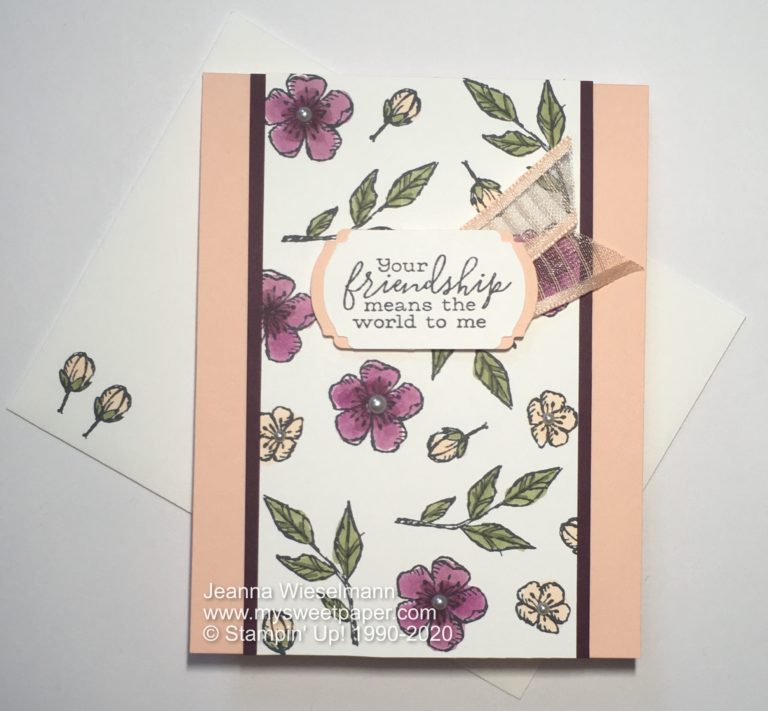
    Floral Free as a Bird Friendship Card

    I’m part of a monthly swap group, and I absolutely love designing new cards each month and receiving others’ designs. In May, we wanted to make sure to use Stampin’ Up! items that would be available once the new catalog goes live on June 3 so that our designs could be replicated. I hadn’t received my pre-order of new catalog items yet, so I went back to my carryover stamp sets and was drawn to the floral images in the Free As a Bird set. I added in some Stampin’ Blends, ribbon, and plenty of Pearl Basic Jewels to finish off this design!

    Card Tutorial

    Stamp with Tuxedo Black Memento Ink

    1. Randomly stamp floral and leaf images from Free As a Bird stamp set on Whisper White cardstock measuring 5 1/2" x 3".

    2. Stamp "Your friendship means the world to me" on 1 1/2" strip of Whisper White cardstock.

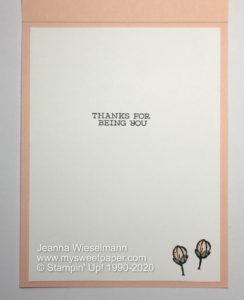
    3. Stamp "Thanks for being you" and floral image on Whisper White cardstock measuring 5 1/4" x 4". This will be the inner panel of the card. OPTIONAL: Stamp flowers on envelope.

    Color

    4. Use Stampin’ Blends to color the stamped images on the 5 1/2″ x 3 ” cardstock and 5 1/4″ x 4″ card insert (and envelope, if you chose to stamp it). I used the Dark Petal Pink, Light and Dark Mossy Meadow, and Light and Dark Rich Razzleberry. I think Blackberry Bliss in place of the Rich Razzleberry would also look great!

    Coloring Tips: for the large flowers, I started with the dark color in the center, then used the light Stampin’ Blend to color to the edges. I prefer dark first, then light for blending. For the leaves, I colored the whole leaves using the light shade, then went back with the finer, bullet-tip dark color to add some lines along the leaf veins.

    Tip for coloring on envelope: the Stampin’ Blends bleed through easily. When coloring the envelope, I slid a piece of scrap cardstock inside just in case it bled through the first layer of envelope.

    Punch 

    5. Use the Label Me Fancy punch to punch out the stamped greeting (on 1 1/2″ Whisper White strip) and a Petal Pink punch.

    6. Using a Paper Snips, cut the Petal Pink punched cardstock in half vertically.Use the adhesive of your choice to adhere these halves to the left and right of the punched greeting.

    Assemble

    7. Use a Bone Folder to fold a Petal Pink card base (11″ x 4 1/4″, scored at 5 1/2″) in half.

    8. Adhere stamped panel to inside of card.

    9. Adhere Blackberry Bliss cardstock measuring 5 1/2″ x 3 1/4″ to the center of the card front. Use Paper Snips to trip any excess.

    10. Adhere stamped Whisper White panel to the Blackberry Bliss, again trimming any excess.

     11. Use Mini Glue Dots to attach 3-4″ of Petal Pink 5/8″ Organdy Striped Ribbon to the back of the punched tag. Trim the ribbon ends at a diagonal.

    12. Use Stampin’ Dimensionals to attach the punched greeting and ribbon to the card front. I centered it from left to right but placed it higher up on the card.

    13. Add Pearl Basic Jewels to the flower centers to finish off the card.

    I hope you enjoyed this card design! I’ve linked all the supplies I used below, and you can order them by clicking the supply images or selecting “Place a Stampin’ Up! Order” along the top of the screen.