Wedding

  • Sale-A-Bration 2020,  Wedding

    Wedding Card Design

    Happy Birthday to You Wedding Card Design

    I'm part of a swap group that creates and swaps new Stampin' Up! card designs each month. I love this group for getting new ideas and pushing my own creativity. Today I'm sharing my February 2020 swap design, featuring the Happy Birthday To You Sale-A-Bration stamp set. I love the images in this stamp set, and the fact that I earned it for free with a $50 purchase was the icing on the cake! (See what I did there?! Pun definitely intended!)

    I immediately thought of a wedding cake when I saw the cake image, so I decided to use greetings from the Flourishing Phrases stamp set to pull the card together. I'll outline the general steps I took to make the card below, but please leave a comment if you have any questions!

    Card Tutorial

    Stamping

    Note: I always like to start with my stamping first. I like to make sure I allow the ink plenty of time to dry, and just in case I mess up, this enables me to flip the cardstock over and get a free second chance!

    1. Use Memento Tuxedo Black Ink to stamp the cake image on a piece of Thick Whisper White cardstock measuring 3 1/2″ x 2 3/4″. 

    2. Still using Memento ink, stamp “Marriage is a Journey” on a 2″ x 1 1/2″ piece of Petal Pink cardstock.

    3. Finally, use Memento ink to stamp a greeting of choice for the inside of the card. I used a piece of 5 1/4″ x 4″ Whisper White cardstock to make sure it would be easy to write in the card, and I used the greeting “GOOD THING YOU GET TO BRING YOUR BEST FRIEND ALONG” from the Flourishing Phrases stamp set… I love how that pairs with the outer greeting!


    Embossing and Coloring

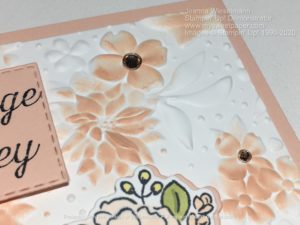
    4. Use the Country Floral 3D Embossing Folder to emboss a Whisper White piece of cardstock cut to 5 1/4″ x 4″. 

    5. With a Sponge Dauber dipped in Petal Pink ink, use a light circular motion to add ink to flowers on the embossed cardstock. Start with a small amount of ink and add on to reach the desired color intensity. This is meant to look random and imperfect, so don’t worry about even or accurate coverage!

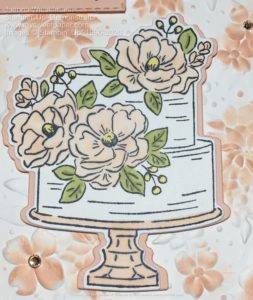
    6. Use Stampin’ Blends to add color to the stamped cake image. I used Dark and Light Petal Pink for the cake stand and flowers, with Light Daffodil Delight for accents. Old Olive (both light and dark) finished out the coloring of the leaves. (See final image on the bottom of the page for more detail.)

    Die Cutting

    7. Die cut the colored cake image using the Birthday Dies.

    8. Cut an additional cake shape on Petal Pink cardstock measuring 3 1/2″ x 2 3/4″.

    9. Die cut the “Marriage is a Journey” greeting using the Stitched Rectangle Dies.

    Assembly

    10. Fold a Petal Pink card base measuring 8 1/2″ x 5 1/2″ in half along the center score line at 4 1/4″.

    11. Use SNAIL Adhesive to attach embossed Whisper White to card front and inner greeting to inside.

    12. Cut Petal Pink Cake in half vertically. Adhere to the sides of the stamped cake image using SNAIL.

    13. Use Stampin’ Dimensionals and Mini Dimensionals to adhere greeting and mounted cake to card front.

    14. Add Champagne Rhinestone Basic Jewels for a final embellishment!

    I hope you enjoyed this swap design. I had such a fun time designing it and can’t wait to share it with some newlyweds this spring! I’ve linked all the supplies I used below, and you can order them by clicking the supply images or selecting “Place a Stampin’ Up! Order” along the top of the screen.