2019-2020 Annual Catalog,  Home Decor,  Sampler

Sailing Home Sampler

About a year ago, as I was wrapping up my dissertation to complete my Ph.D., I was brainstorming gift ideas for my advisor. In addition to supporting me academically in so many ways throughout grad school, she and I traveled the world together presenting our STEM education research and working with teachers. In less than four years, we traveled together to Australia, Japan (several times), South Korea, Taiwan, Italy, Finland, and numerous cities within the U.S. What kind of gift do you give someone who has played such a significant role in your life? A hand-made gift, of course! I love the nautical theme of Stampin’ Up’s Come Sail Away suite, and the Memories & More card that says, “What is life but a grand adventure” was the perfect sentiment. I designed this 12×12 sampler, then framed and gifted it to my advisor.

Although the stamps and dies will be carrying over into the 2020-2021 catalog, the Designer Series Paper I used for this sampler is now listed as a Last-Chance product. This means it’s only available until June 2 or while supplies last! In addition, some of the other items (Come Sail Away Memories & More Cards, Sail Away Trinkets, Metallic Brads, Baker’s Twine, and Magnolia Lane Ribbon) are retiring and on the clearance rack, so now is a great time to buy them at a discount if you’re interested in completing this project!

Sampler Tutorial

1. Cut Cardstock, Designer Series Paper, and Memories & More Cards

There are three sets of layering sizes that make up this sampler. Each basic card element is composed of three layers: Night of Navy cardstock as the largest, Sahara Sand cardstock as the middle, and either Come Sail Away Designer Series Paper or a Memories & More card for the smallest. Cut these elements first.

Central Piece – What is Life but a Grant Adventure (cut one of each size)

  • Night of Navy: 6 1/2″ x 4 1/2″
  • Sahara Sand: 6 1/4″ x 4 1/4″
  • Memories & More Card: 6″ x 4″

Side Pieces to Left and Right of Center (cut two of each size)

  • Night of Navy: 4 1/2″ x 2″
  • Sahara Sand: 4 1/4″ x 1 3/4″
  • Designer Series Paper: 4″ x 1 1/2″

Pieces Lining Top and Bottom (cut six of each size)

  • Night of Navy: 3 1/2″ x 3 1/8″
  • Sahara Sand: 3 1/4″ x 2 7/8″
  • Designer Series Paper/Memories & More Card: 3″ x 2 5/8″
 

2. Stamp Images

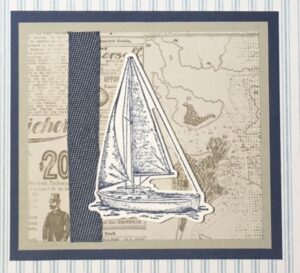
Use Night of Navy ink to stamp a lighthouse and the larger sailboat on Whisper White cardstock.

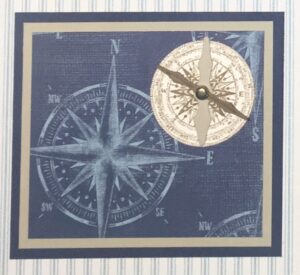
Use Soft Suede ink to stamp the smaller sailboat, a compass, and an anchor on Whisper White cardstock.


3. Die Cut Stamped Images and Additional Shapes

Use the Smooth Sailing Dies to cut the stamped anchor, sailboats, and lighthouse. In addition, cut:

  • Soft Suede rope
  • Soft Suede ship’s wheel
  • Soft Suede compass needle (small)
  • Sahara Sand compass needle (large)
  • Night of Navy seaweed
  • Balmy Blue seaweed

Use the Layering Circles Dies to cut the compass and two Night of Navy circles.


4. Assemble Each Component

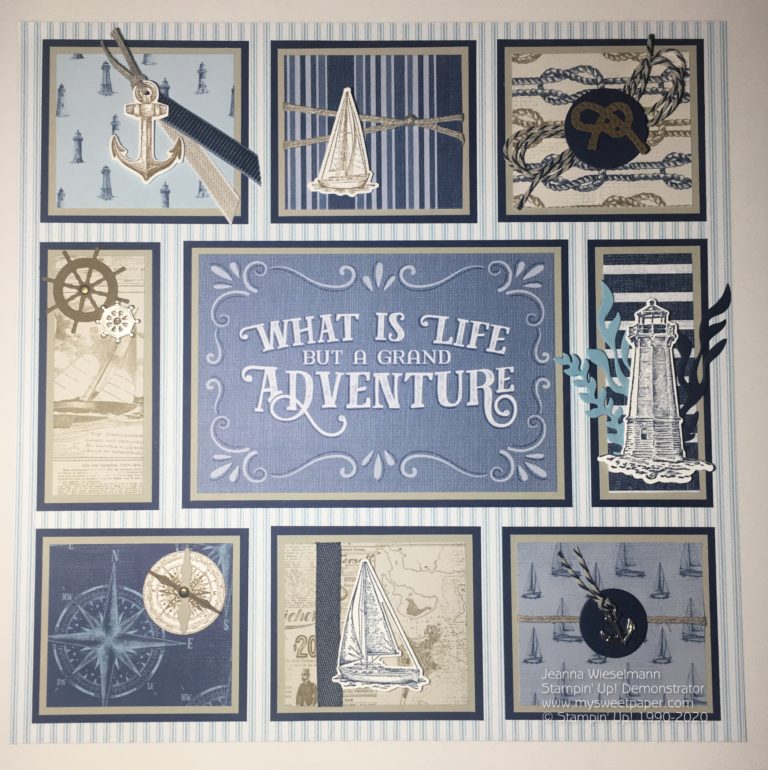
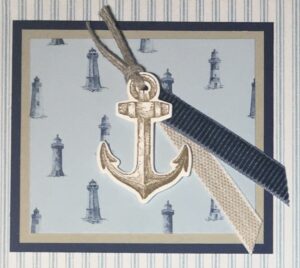
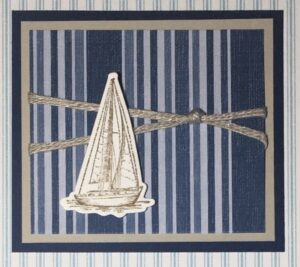
Use the close-up images below to assemble the components. Make sure to pay attention to where the ribbon/twine is placed, often just around the first layer.

I used a variety of Tear & Tape, Snail adhesive, Glue Dots, and Multipurpose Liquid Glue. If you are planning to frame this in a frame with glass, I do not recommend using Stampin’ Dimensionals, as they will just get flattened in the frame.

5. Adhere Components to 12″ x 12″ Designer Series Paper (DSP)

I would recommend first placing the 12×12 DSP in your frame and marking the DSP with a pencil at the edge of the frame so you know how much of it will be showing. Next, place the central component, using a ruler to ensure that it is perfectly centered from top to bottom and left to right. I used Tear & Tape adhesive for securing these components because I wanted it to be very strong.

Add the two side pieces to the left and right of the central component. Make sure to align them with the central component at the top and bottom, and center them between the central component and where you marked the edge of the frame.

Finally, add the six additional components on the top and bottom. I recommend starting with the one in the middle, making sure it is perfectly centered to the left and right of the 12×12 DSP and centered between the top of the central component and where you marked the edge of the frame. Once the middle piece is in place, the two side components are easy – just make sure to line them up along the top with the piece you just placed and to the side of the already placed pieces.


I hope you enjoyed this design! I’ve linked all the supplies I used below, and you can order them by clicking the supply images or selecting “Place a Stampin’ Up! Order” along the top of the screen.

Leave a Reply

Your email address will not be published. Required fields are marked *